A step-by-step guide to how I created this portrait.

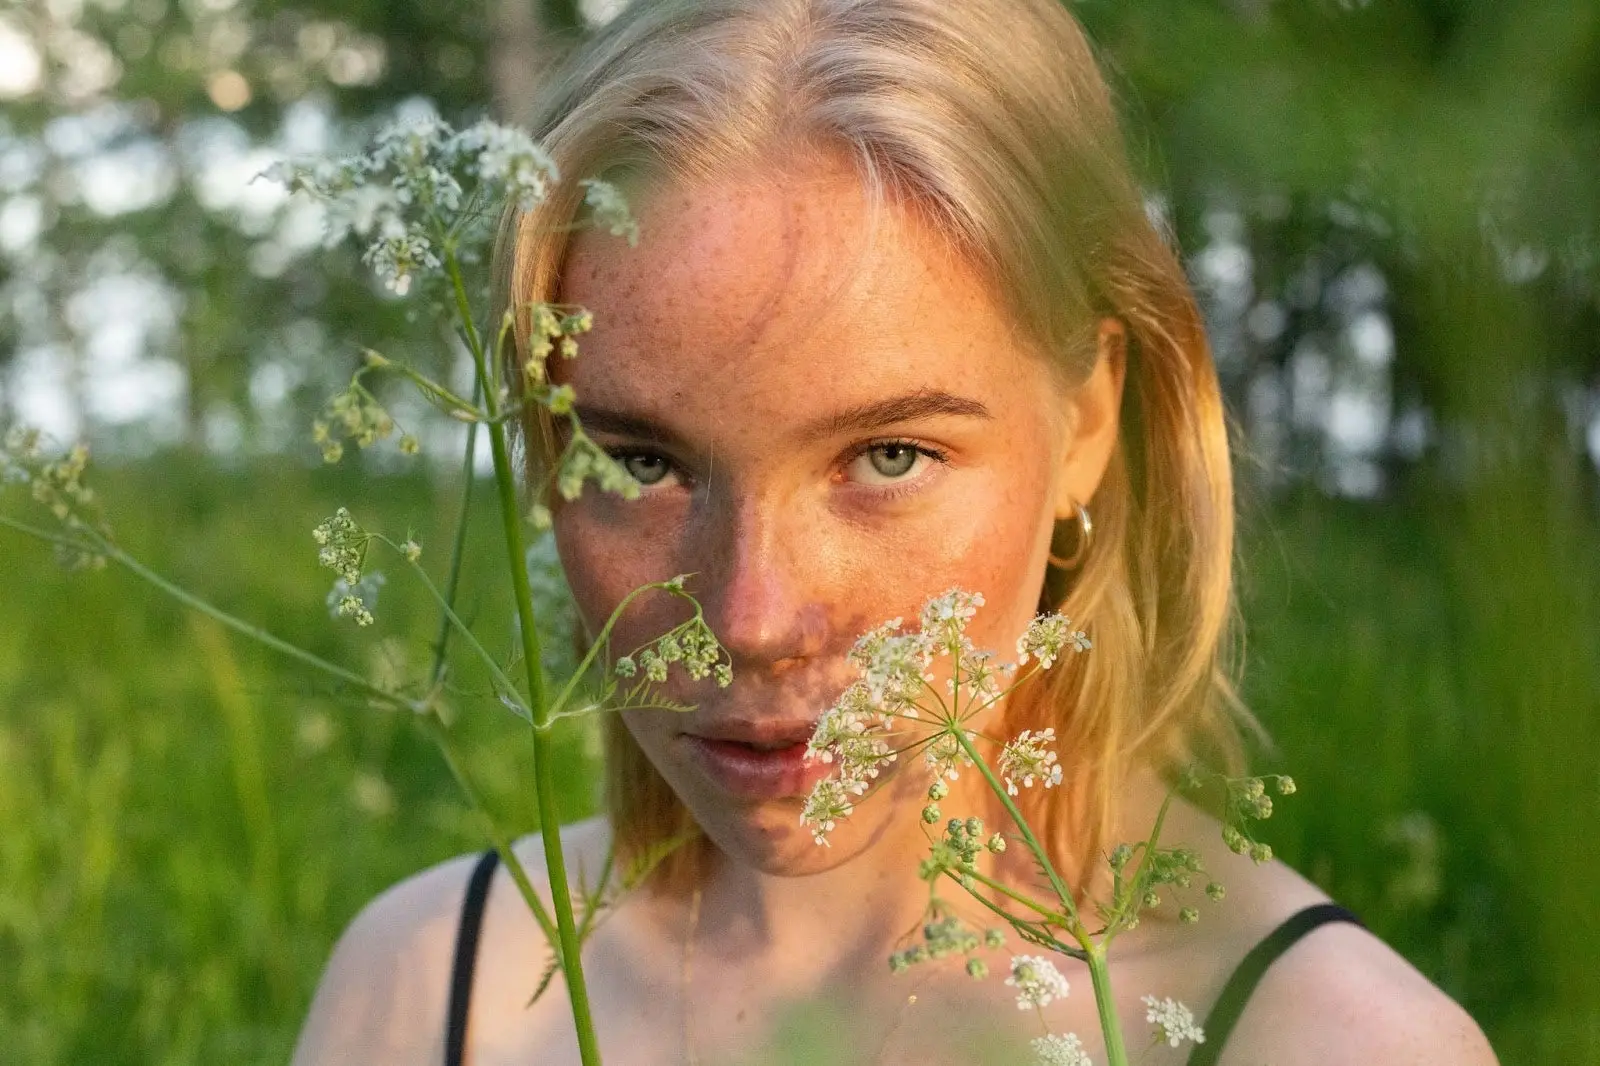
In this article, I take you step by step through my process for creating this image featuring the Finnish model Nea Hassinen.
Contents
Setting the mood.
As a portrait photographer, I’m always looking for the right setting and mood to match the energy my subject gives off — and vice versa. Nea Hassinen is a young, up-and-coming Finnish model and she has a specific look that I find deeply compelling. In this case, I was going for an earthy mood for my shoot and her freckles and green eyes felt like a perfect fit.
How a shoot turns out has to do with more than how a subject looks. The whole time I’m taking photos, I’m trying to get a sense of that person and what they represent. Sometimes you put someone in a certain outfit, surrounding, or atmosphere, and you realize it doesn’t quite fit. Fortunately, this was not one of those times. Nea was right at home in the outdoors, and together we were hunting the sunset in order to capture the really warm, cinematic light seen here.
Before I begin editing a photo, I have to spend time with it, looking for the focus of the image and the details I want to draw out.
Finding my focus.
Before I can edit the image, I have to study it. I study the mood of the lighting and the composition as a whole, along with the colors and individual elements. In this case, Nea’s blonde hair stands out from the green background, so right away I know I’m going to make the background blurry and emphasize the division between the two.
I do most of my work in Lightroom, where I can quickly and easily play with color saturation and exposure — two of my favorite tools.
Pushing the limits.
I begin by experimenting in Lightroom, turning the exposure tool all the way down to see where the details and the contrast really start to emerge. I play with the highlights, shadows, and black and white tones, pushing each to their extremes and observing again which details catch my attention — and how those details affect the overall image. Once I have a feel for all the underlying elements, I revert the image back to its original form.
Looking at this particular photo, I know I want the green in her eyes and the surroundings to pop since they’re so well matched. I also love the ethereal mood the color emits. I go to the settings in HSL/Color to experiment with the green hue before increasing the saturation. Right away I know I want to give the bokeh (or blur) more color, so I increase the image’s overall saturation further. Doing so not only brings out the blues and greens in the background, but the contrasting glow of her blond hair as well.
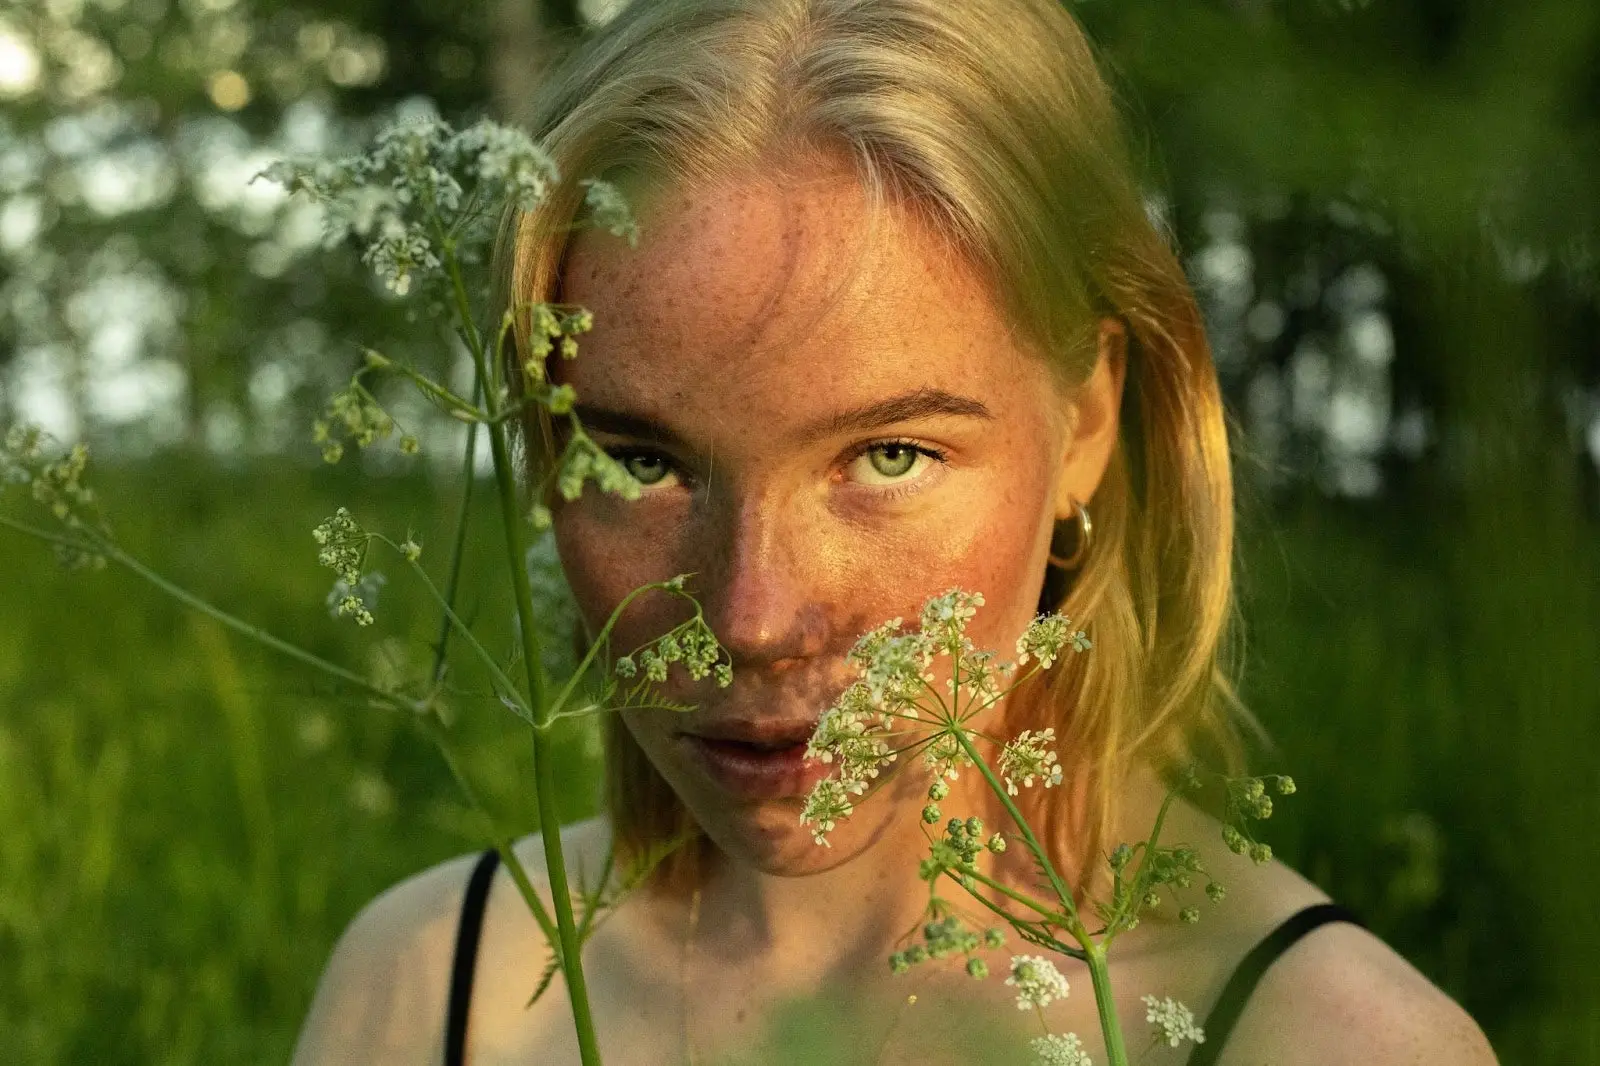
I am constantly playing with shadow. I love the cinematic, evocative mood it conjures in my work. This image is no exception.
Playing with darkness.
With the colors in place, I return again to those basic light tools — highlights, exposure, and shadows — and begin darkening the image once more. This time I’m not looking to unearth any details as much as I am trying to finesse the ones I already have. Typically, this means darkening the image and then increasing the contrast to really emphasize divisions — in this case the one between Nea’s head and the background. These divisions are part of what creates that cinematic feel I’m always striving for.

As much as I love color, I’m equally drawn to the work of greats like Peter Lindbergh. This means no matter how attached I am to an image in its color form, I will always see what it looks like in black and white.
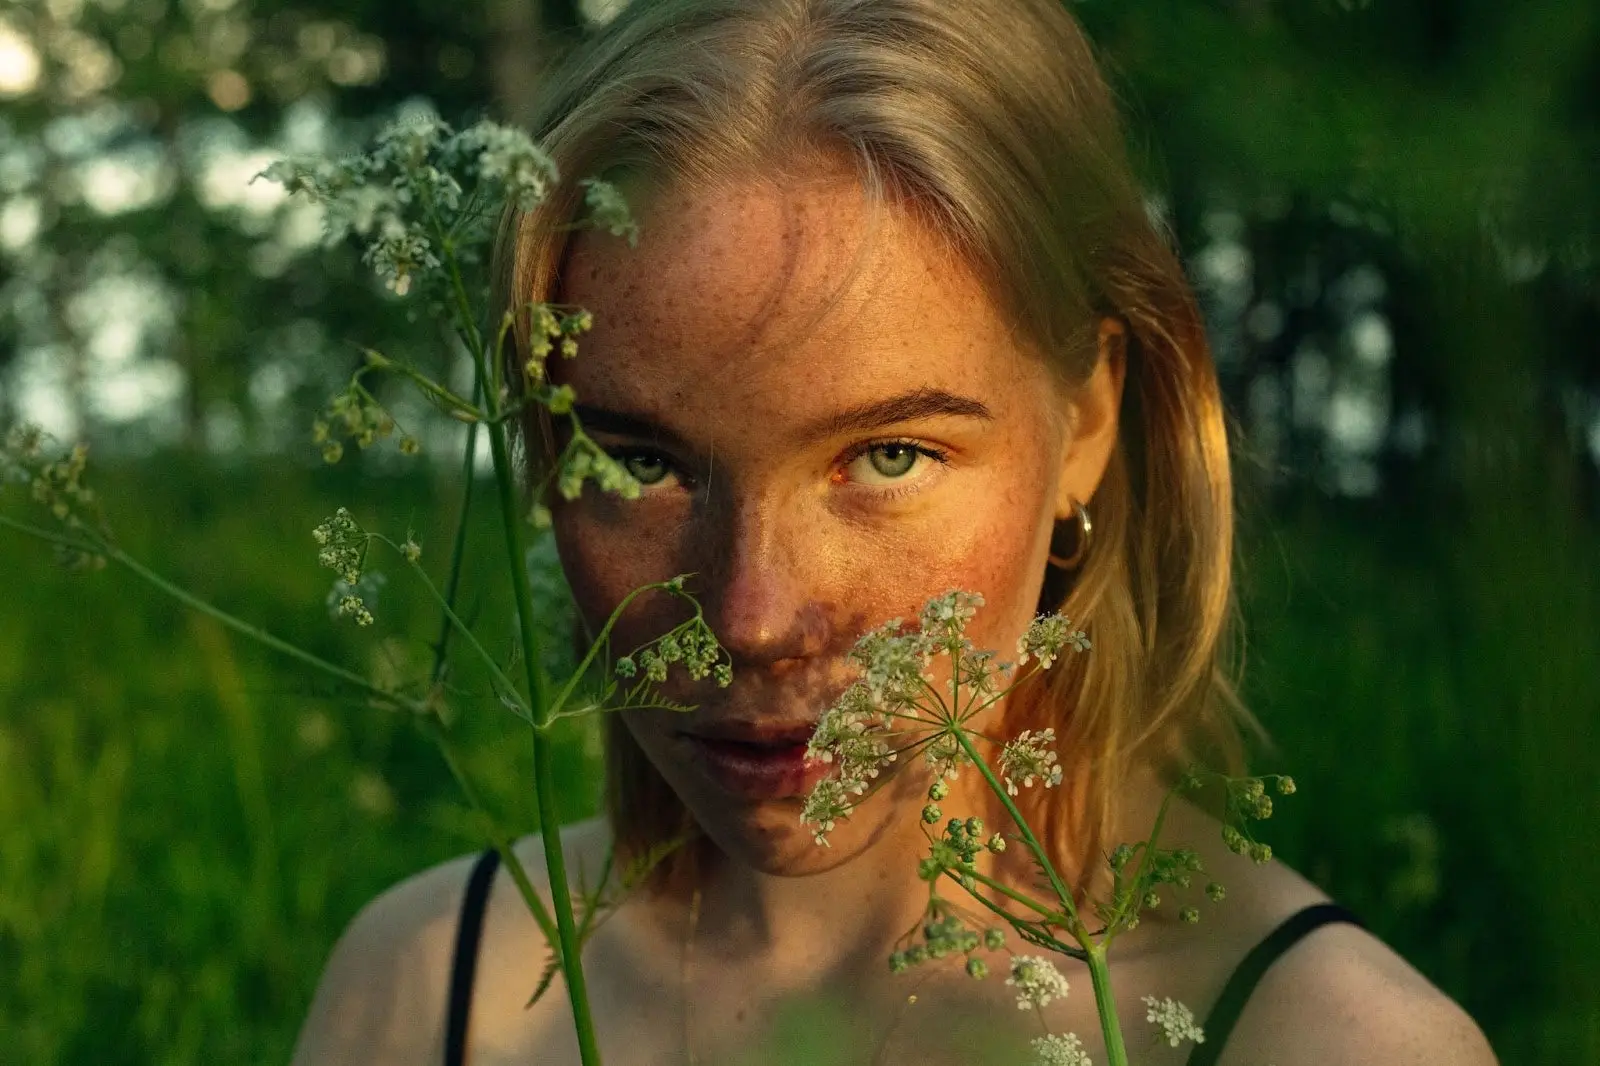
Stripping away color.
At this point, I have the focus, lighting, and details all in place. Now comes the time to try it out in black and white. Sometimes it works, with the settings I have, to just select the “monochrome” profile in the basic editing panel, transforming the image with a single click. In this case, I used my own preset that really brings out the clarity and structure of an image.
Once I apply my preset, I use the adjustment brush to brighten her eyes, really establishing them as the focus of the image. I brighten her freckles and the delicate plants using the same tool. With that out of the way, I again make sure to clearly divide the subject from the background, once more using tools like the brightness, contrast, and exposure sliders. Another tool I like is the black and white mixer, which allows me to adjust the white in every color of the image. I’ve been known to use this B&W mixer to turn the sky completely white in order to make my subject practically jump out of the frame.
Stepping back.
Knowing when a photo is done is always difficult for me. Sometimes I need an entire day with one photo before I’m really happy with it, at which point I force myself to leave it alone and come back and look at it with fresh eyes later. That said, I always feel like my best editing happens when the shoot is still fresh in my mind.
In this particular shoot, I didn’t end up using Photoshop. I simply work faster in Lightroom when it comes to lighting, saturation, and all those basic editing functions. That changes when I need to do some major skin retouching or stamp out a distracting feature, at which point I can simply right click inside of Lightroom on an image and select “Edit in Photoshop.”
Another reason I turn to Photoshop is to play with perspective. In this image, I used the pucker tool within the liquify filter to make the head and upper body smaller and the legs longer. The result is a slightly more surreal photo than I was able to achieve simply by getting my camera as low to the ground as possible. Photoshop is also where I go to deepen shadows, which I do using a luminosity mask, or achieve a really great vintage feel using the gradient map feature.
Drawing inspiration.
I find inspiration from a lot of different portrait photographers whose styles sometimes appear at odds with each other — at least on the surface. I’ve spent a lot of time studying Chi Modu’s work and the way he captured hip-hop icons like Tupac and the Notorious B.I.G., along with Peter Lindbergh’s timeless black and white images. Alessio Albi and Marta Syrko are both incredible at capturing the warmth I’m always looking for in my own work.
If there’s anything that ties these photographers together, it’s the intimacy they’re able to capture and create — an intimacy I’m always searching for, even when my love of the extremes means my images end up edging toward abstract art.
Check out Adobe’s guide to portrait photography for more on the rules of portrait photography — and how best to break them.
Source : Adobe